Monday, September 24, 2012

Weekend terrain party

As I wrap up my WWII project and look ahead to my first foray into moderns, I decided to use the interlude to catch up on some terrain features.  First up were some stucco houses for my 1993 Somali scenario.  Whether I choose to game in Mogadishu, Afghanistan, or Falujah, these simple dwellings will come on handy.  Even on the small boards used in Force on Force, you need a lot of buildings.  I'll probably buy some JR Miniatures for the centerpieces, but I'll fill in the outlying districts with houses like these.  I made these houses out of foamcore board, purchased for a dollar a sheet at the local dollar store.  An exacto knife and some white glue was all it took, then a quick spray with some stone-finish paint I had laying around from a long-forgotten project.  Five houses took less than two hours start to finish, including drying times for the glue.

Self-adhesive floor tile, which cuts easily with a hobby knife, provided the base for these ponds/marshy areas.  Using the method I used to create embankments for my hedgerows, I defines the edges of the pond.  A quick spray of primer, then I painted the water (very thinned layers of dark blue, blue, and green) and terrain.  I applied a heavy coat of gloss varnish to create a water effect, then I added flocking to the ground bits.  Viola!


Sunday, September 23, 2012

Inventory Time

I just took stock of the metal figures I have painted in the last two years, and what remains in my Mountain of Lead.  Since my gaming is mostly solo or with students who are new to wargaming, I tend to buy two armies to fight against each other.

I've been busy, it seems!

Armies in parentheses are still unpainted.  I'm thinking of doing some WWII and gunfighters to sell on ebay to replenish my ebay account, then it's on to Mogadishu, 1993.


15mm Zulu War
                British
                Zulu
10mm Napoleonics
                French
                Austrian
                (British)
10mm ACW
                Union
                Confederate
28mm Old West Skirmish
                Cowboys
                Banditos
10mm HYW Medievals
                French Army
                English army
15mm AWI
                British
                American
10mm WWII
                American
                German
15mm Dark Ages
                (British)
                (Saxon)
15mm Vietnam
                (USMC)
                (Vietcong)
15mm Modern
                (US Rangers)
                (Somalis)


Tuesday, September 18, 2012

DIY Hedgerows and Artillery Markers


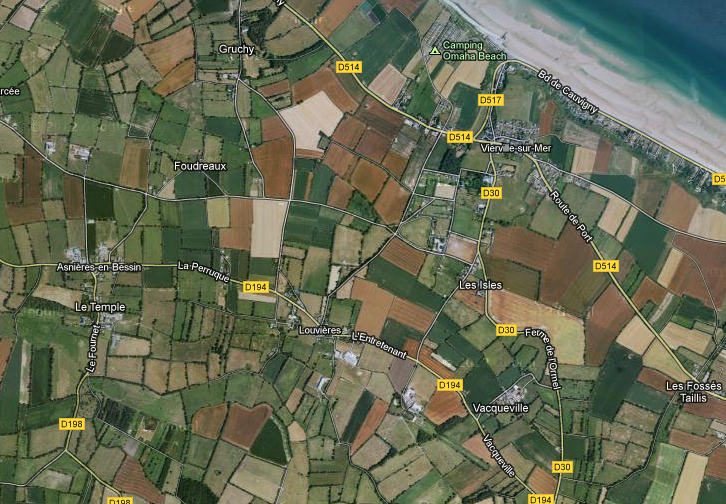
I wouldn't say I'm cheap.  Well, my wife would.  So would my kids.  And my parents.  And pretty much anyone who knows me.  So when I decided to game the Normandy Campaign of 1944, I was a little anxious about filling the table with bocage terrain.  All those hedges, done in resin, would be incredibly expensive.  Besides, I wasn't thrilled with the look of the commercial models available.  I had been to Normandy in 2004, and I wanted a combined earthen embankment with bushy foliage atop it.  And I wanted lots of 'em, so that my table would look a little like the image below, taken from Google Maps of the land just inland from Omaha (where my Grandfather landed on June 7th.  He was in the 29th but his regiment, the 175th, avoided the 'Saving Private Ryan' landing by being the divisional reserve).

My mission, to make lots and lots of hedgerow markers.  They had to be cheap, they had to be quick, and they had to look good.  I assembled the following materials:

*Popsicle sticks (thank you dollar store!)
*White glue (again, a dollar store special)
*Small pebbles (is use commercial talus, a $3 bag I bought years ago.  I used maybe a tenth of it in this project)
*Sand.(I took a jar from the playground where my kids play)
*Craft paints ($2 a tube.  You need some to represent earth, and some white to lighten it for drybrush highlights)
*JTT Coarse Foliage-Fiber Clusters (Light Green).  (At $5 a pack, this was the expensive part of my project.  A pack is good for about 40 4" hedgerow sections)

I did my hedgerows in batches of 16-18.  First, I laid down a thick coat of white glue on each popsicle stick.


Then, I packed as much talus onto each stick and allowed it to dry overnight. My goal was to add some shape and height to the embankment, which I would not get if I simply used sand alone.   I suppose this process could be repeated for an even steeper embankment, but for me it was not worth the time.


The next day, I covered the talus with a watered down white glue (1 part water to 1 part glue).  Then, I liberally spread sand atop the glue.  This takes some of the rough edges off the talus, making the embankments look more like earth than rock formations.  Then I allowed them to dry overnight.


Apply a coat of spray primer.  I use black.  I suppose I could have saved time by using a brown color similar to the earth tones I normally use for dirt.  No biggie, though.  When that was dry, I applied brown craft paint liberally on each popsicle stick.  Craft paint is not as pigmented as my model paints, so a few coats were needed.  Craft paint is cheap, though, and these are simple to paint, so it went fast anyway.  When I was happy with the result, I applied a lighter shade with a drybrush to bring out details and textures in the embankment.  You can see the different drybrushing makes in the stick in the foreground below.


One last step: apply a generous line of undiluted white glue atop the painted embankment.  Pull out a foliage clump and roll it into a 4" long snake. When it is the right length, press it firmly into the strip of glue.


The finished product.  It stands about 1.5-2.0 centimeters high, more than enough for 10mm or 15mm troops to seek shelter behind.


And here is my latest batch laid out on my dining room table.  Three more batches, and I should have enough for a real boage rumble.  Cost per 4" section works out to under $.20.  And while they took three days to make (owing to the time each layer of glue or paint took to dry), actual worktime was under two hours for 18 sections of hedgerow.


At the same time, I also bade some quick and easy artillery blast markers.  All it took was some steel wool (#oo grade), some epoxy cement, sand spray primer, a few pennies, and some paints.

First, I tore clumps of steel wool about 3" high and used the epoxy to glue them to the pennies.  I sprinkled some sand around the edges of the base, to create more textured earth when I painted them up.  I teased the steel wool out into slightly irregular shapes so it looked like a rising smoke cloud.


Back spray primer creates the distinct impression of a smoke cloud. I left several markers unfinished at this stage to use as smoke markers on my battlefield.  For artillery blasts, I saturated the steel wool close to the base, first with red, then with yellow paint.  Then, I lightly brushed the outer fibers with yellow, red and white.  Paint and highlight the bases an earthen color and...voila!  Blast markers for mere pennies!


Friday, September 14, 2012

Military History Class: Tactics Exercise


 My Military History course is up and running, with ten high school seniors (five boys and five girls).  After reading a few chapters of Sun Tzu and Clausewitz' handbook on tactics (published in 1810, a few years before On War), I gave them a tactical problem.  They had a division of Napoleonic French to deploy, with some supporting cavalry and infantry.  None of them knew where or how the Austrians to their north had deployed.  Each student prepared a plan for homework.  I broke them into small groups, each of which presented a refined plan to the class.  My department head was observing, so he chose the plan that he thought was best thought out.

They took a few lessons from their readings to heart: to avoid a frontal assault against a prepared enemy, to pounce on a weak point with the greater part of your strength, to use skirmishers to learn the disposition of the enemy.  No-one really understood what to do with artillery (though Clausewitz was pretty clear on its use), and the concept of pinning down the enemy's strength was challenging for them.

Here are the three plans.  The first is by an all-girl group that thought a pincer movement would trap the Austrians.  They referred to the happy guys in the center as their "sacrifice".  They need to use the term "pinning force."
This group had a very complex plan, all strong side and no weak side.  While the objectives of each unit were well considered, my department head rightly pointed out that each element's success depended on the success of the unit before it, and one slight hiccup could bollix up the whole works.


Here's the plan that eventually won, more or less a compromise between the two other approaches. If the small holding force in the center remains strong enough to hold off the main body of the Austrians, they stood a good chance of rolling up the ridgeline with their main body and flanking the Austrian infantry.

Then, for fun, we set the table with my 10mm Napoleonics.  A few were disappointed that we didn't game out the rest of the scenario.  For that, they'll have to wait until next month.


Wednesday, September 12, 2012

Mainstream Media takes a look at the hobby

I enjoy the varying political perspectives I get on Slate.com, and their columns on art and architecture enrich my understanding of a topic I love.  But I never expected to see a serious article about my hobby posted there....OK, almost my hobby.  I don't play GW games.  But it is a pleasure to read an article concerning gamers and military personnel that does not portray either demographic as socially-awkward, potentially violent sociopaths.

Read the full article here.

Tuesday, September 11, 2012

Timecast Houses

I bought some Timecast resin buildings in 10mm scale to populate my WWII and Napoleonic battlefields.  Even using craft paints (which are frustrating to me since I need four coats for them to look halfway decent), they look pretty nifty.  I'm pleased with how the stucco and tile roofs came out.  At the scales I play, each building will have to represent a group of buildings, because they take up a relatively large area on the battlefield.  That's OK, though.  Smaller scale buildings look silly next to my figures.