Saturday, May 28, 2011

10mm Old Glory Knights

I finished my first batch of 10mm knights, mounted for Impetus. I'm a clumsy painter, so I let myself follow the heraldry of the 12th-13th century. The figures (Old Glory Grand Scale 10mm) are sculpted for 15th century, so they're a little anachronistic. But have you seen taht 15th century heraldry? Ain't no paintbrush in the world that would work in 10mm scale. So I'll live with anachronism.

Hey, I have a Ph.D. in Medieval Studies. Who are you to criticize me? These knights reflect a "retro" craze that was all the rage in 1447. Yeah, that's it. I read it in an unpublished manuscript somewhere. So there.

Anyhow, I know I can do better than this. My ink wash came out a little heavy, resulting in a muddy look. At least the colors are bright, and one has to love the look of the Impetus "big bases".

In the first photo, my billmen are thinking that their days as tabletop soldiers are seriously numbered... (As always, click to enlarge)


And here, the knights show off their discipline in an echelon parade maneuver.

Did I mention that I was using these knights for fantasy battles as well? :)

Monday, May 23, 2011

My first 10mm Medievals!

Just for kicks, I painted up a single unit of billmen for my 10mm medieval army. They are mounted for Impetus on a 60mm x 20mm base.

Thursday, May 19, 2011

The Battle of PLaytest Moor: The Beginning of the End

Well, the battle appears to have passed its crisis stage, and I must confess that my French have gotten the worst of it.

With the battle looking grim in the center and the right, the French light cavalry decides to launch into the damaged square of Landwehr in front of them. The landwehr rout, but the line infantry to the rear have time to form square, leaving our French cav vulnerable. They peel off, bloodied and disordered, but at least they managed to rattle the Austrian square.


In the center, while the French have driven off the hussar attack with a timely defense, their column is weakened and their line is wearing thin. Even though the Austrian reserve column is crappy landwehr, that may be all it takes at this stage of the game.


The Bavarians have driven off the Austrian advance guard, and it will come down to a slugfest in a turn or two. However, the Austrian cavalry, having demolished the battalion protecting the Bavarian flank will be in a position to tear into the Bavarian column in the flank, even if they are victorious in the melee.


So if I were a real-life French general at this point, I would signal a controlled retreat. Tactically, we could then declare the battle a draw (and Austrians would call it a major victory on their part. Later, historians would call it a minor defeat for the French). However, I'll play out one or two more turns, just because I like to punish myself.

Sunday, May 15, 2011

Playtest Moor, the moment of crisis

After four turns, the moment of crisis has arrived. While the battle is far from over, all reserves have committed. From this point on it's pretty much dice rolling.

This is the center, and as predicted this bloody scrum looks like it will determine the fate of the battle. The French skirmish screen has melted away. The French Brigade column has driven away the battered Austrian battalion before it, but now it must face a regiment of hussars. If it cannot stand a cavalry charge, the French heavy artillery behind it is vulnerable. Meanwhile, the French brigade on the other side of the river may finally see some action, but it looks unlikely to bring its full strength into battle.


Here on the French left, things have not changed much. The Austrian squares are taking a pounding, but reducing them is taking a long time.


On the French right, the Austrians have crossed the river. Another regiment of hussars has charged the Bavarian battalion left to guard the flank. Despite a devastating volley, the charge hit home (no time to form square). However, the hussars pursued their hapless foes, and they will be along time recovering. The French artillery on this flank has been pretty much taken out by a screen of jaegers who seem immune to cannister fire. The lead Austrian battalion was cut up pretty bad by the defenders, but now both sides are in a position to launch their attack columns. It will be a good test of brigade columns vs multiple assault columns.


Some rules tweaks are definitely in order. Hits on dense formations are easier to obtain, but they need to do more damage. While I wrote rules for multiple combatants, I need to add something for units behind a charge. Can cavalry behind a screen of infantry countercharge, or do they need to wait until the next turn.

I'm finding the combat system to be a grindfest up to a point, but once units lose a stand and/or go shaken, things go downhill very rapidly. I think I'll need another game to decide whether I like that or not.

Saturday, May 14, 2011

10mm Medievals ready to go

While my Napoleonics game is going on in the basement, I took advantage of a quiet hour to set up and prime a few units worth of medievals. I'm going to mount them for Impetus, which uses large bases, so it was necessary to glue them to popsicle sticks first, since they will be impossible to paint once they are based.

As predicted, the wire lances and spears proved to be a pain in the tucas. I'm not about to dremel holes in 50+ minis (there's no way that scenario is going to end well). So with a dab of cement, I propped the spears in the desires position and hoped for the best. After priming, three came loose and had to be reglued (you can see some of the damage in the photos). At least the riders went neatly on the horses.

I'm not looking forward to painting heraldry on the knights at this scale. On the plus side, the infantry should paint up fast. While I am not in as great a hurry as I was with the Napoleonics, I hope to have the first seven units done by the end of June.


Friday, May 13, 2011

Playtest Moor, the early turns

The first two turns are complete. I'm happy with how quickly my rules play, and thus far, they seem to simulate Napoleonic battlefield conditions with the right "feel." I tend to subconsciously favor my own side when I play solo, but this has been anything but a walkover for the French. Depending on the next few turns, les Francais may have to slink off with their tails between their legs.

So on to the story of the battle. On the French left, things unfolded pretty much as expected. The forward Austrian battalions went into square at the first sight of the French cavalry. The French, with their advantage in artillery, proceeded to pound the Austrian squares. Progress is slow, however, and the French may have to risk a charge before the squares are thoroughly reduced. Then there is that second line of Austrian defense which will also have to be taken out. If one Austrian infantry brigade winds up holding off two brigades of French cavalry, it will be a major victory for the Austrians.


Hoo, man. This is where the battlefield gets messy. The French line is split by a river. One French Brigade is left on one bank of the river, facing a skeleton force of Austrian infantry, while the other brigade got hammered by a few fierce volleys from the Austrian jaegers. The Austrians, sensing weakness, launched their forward line in a charge. The French held on better than expected, bloodying some of those distinctive Hapsburg noses, but they are not likely to last another turn. The French are frantically trying to wheel their assault column into position for a counterattack, but if they do not win initiative next turn, they might get smacked in teh flank. Even if they do smash through the remnants of the Austrian charge, they will have to face off against an equal number of landwehr and a regiment of hussars.

Below is the lonely French brigade stranded across the river. Crossing will put them into disorder for an Austrian counter-attack, and maneuvering into road column in order to cross at the ford might make them too late to help their buddies.

The Bavarians threw two battalions into line to cover the rest of the brigade from moving up to the main central melee. The Austrians, sensing weakness, throw four line battalions and some hussars across the river. If those two line battalions do not put up a good showing, the entire French right is doomed!

(Man this is way more exciting than I thought)

Tuesday, May 10, 2011

The First Battle of Playtest Moor: Deployment

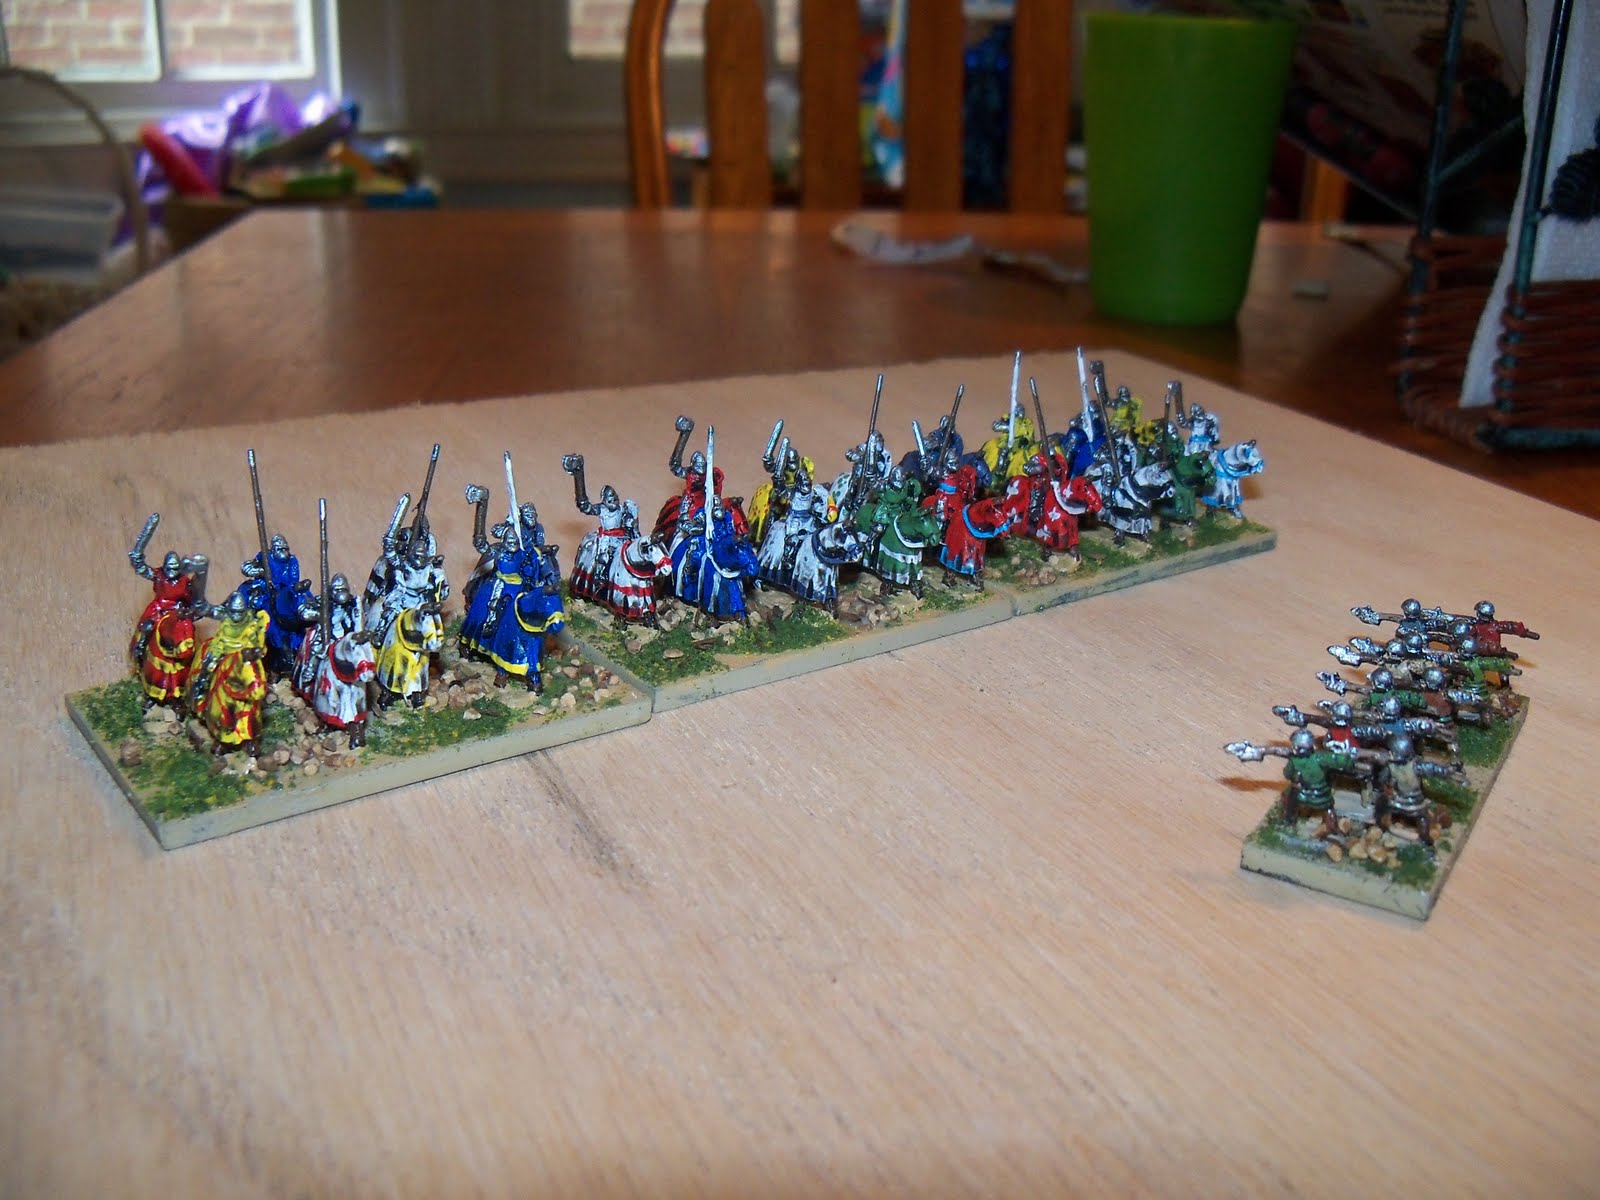
Now that I have a substantial number of 10mm Napoleonics painted, I'm ready to try out the rules I wrote in a preliminary playtest battle (not yet ready for human consumption).

On the French side, I have three infantry brigades in a strong division with supporting artillery. One of the brigades consists of Bavarians. I've always had a soft spot for Bavarians, so it is with regret that I rated them "inferior" for this battle. The French also have two brigades of cavalry, one of chevaux-legeres and one of dragoons.

The Austrians have three strong infantry brigades. Two of them have a high proportion of landwehr troops. All have supporting cavalry and artillery, making each a well-balanced force. The Austrians also have a small brigade of dragoons.

I assigned each brigade on each side a sequantial playing card, red for French and black for Austrians.

As always, click the photos to see the bits that Blogspot cropped off for your protection.

From De nerdibus


Then I placed five sequential red cards (the Ace through five of diamonds) face up on the French edge of the board (I'm playing for the French side). Then placed six sequential black cards (the Ace through six of clubs) face down on the board on the Austrian edge. In other words, two of the Austrian 'brigades' were dummies which I would not find until they came within 12" of one of my cards.

From De nerdibus


Each side alternated moving cards. There were no terrain limits, and a player could elect to move the same card on consecutive turns. When cards came within 12" of each other, both were revealed. The moving player deployed the brigade in question first, followed by the other player. If the Austrians revealed a dummy, the French still had to deploy.

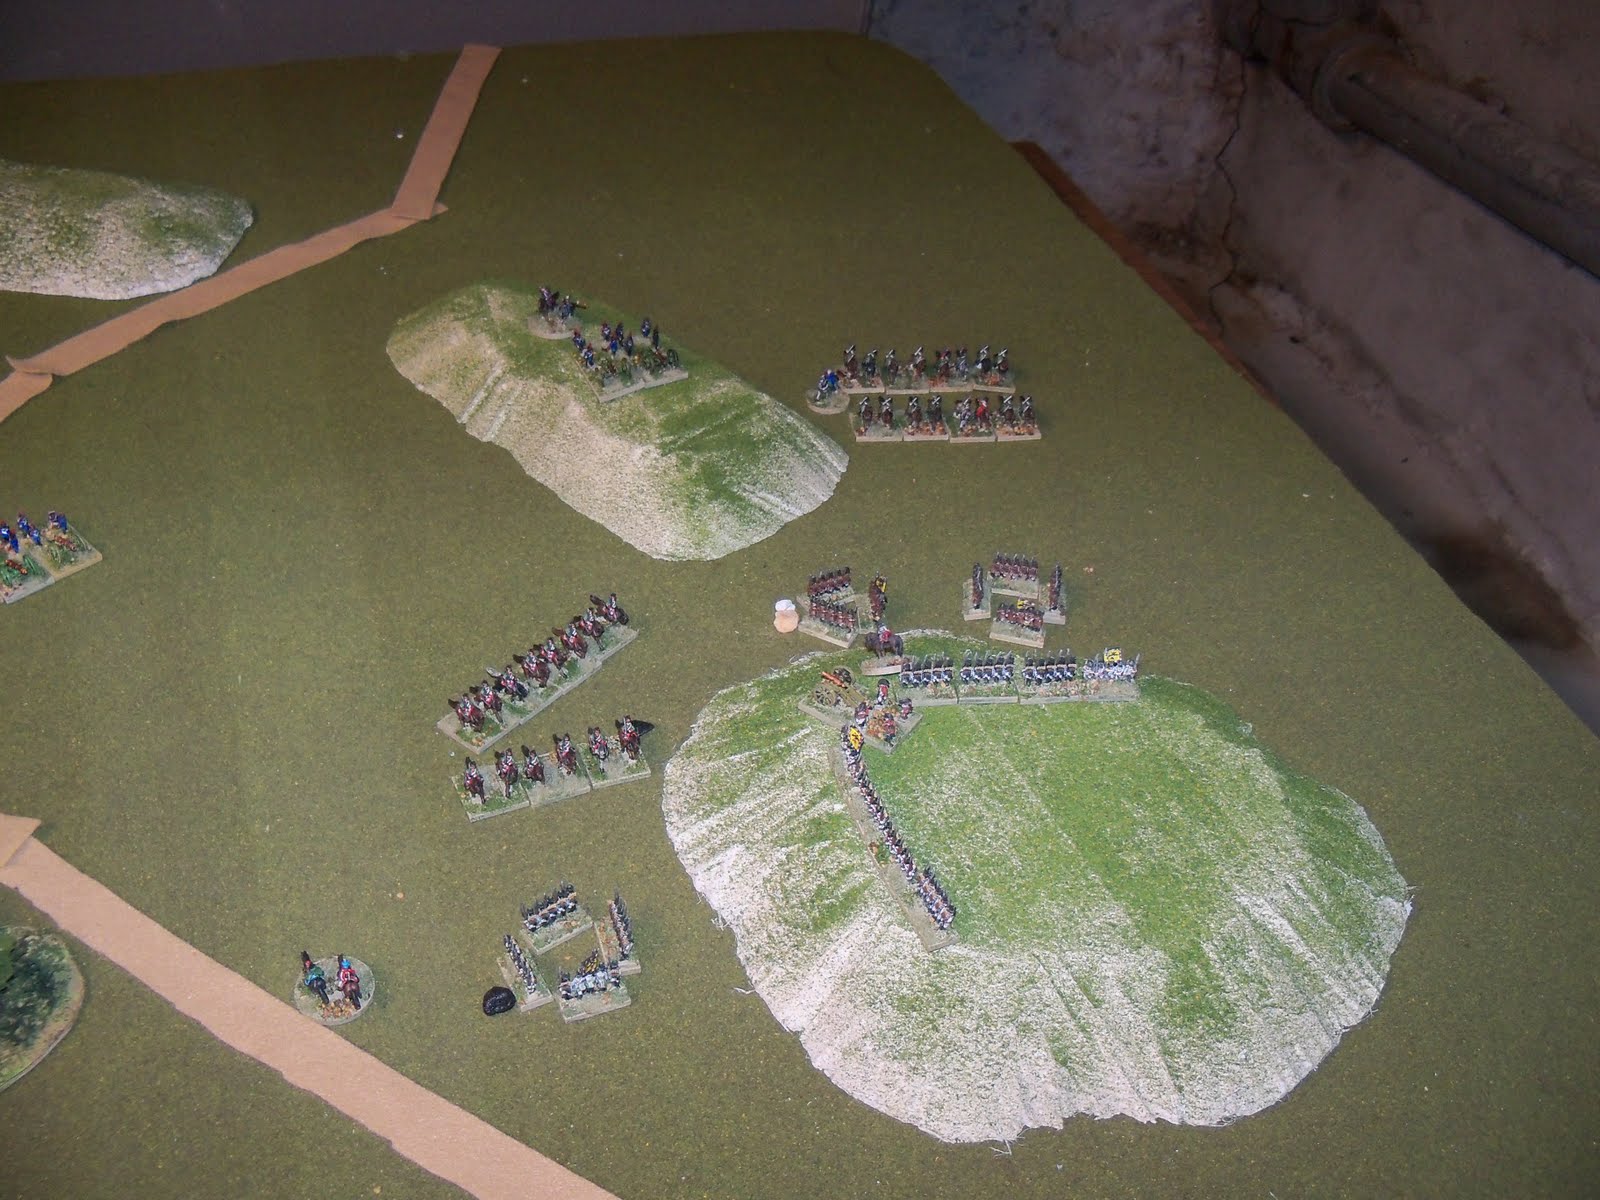
Here is the situation after the first four brigades have been revealed. The Austrian Dragoons wound up in the center, facing some French infantry on the far bank of a shallow river. Two other infantry brigades face each other across an important crossroads.

From De nerdibus


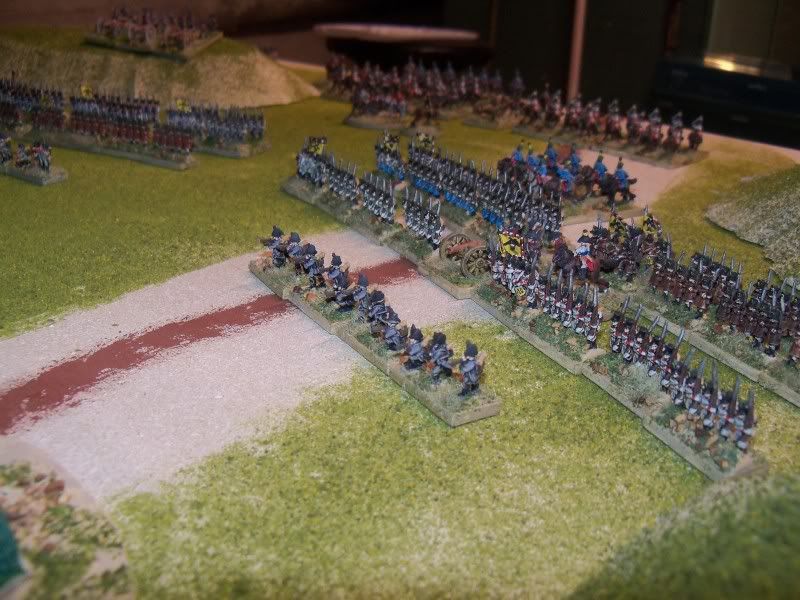
Here is the situation at the end of deployment. The French right looks particularly weak, as the Bavarians were revealed far from the action, so they were strung out in a road column. However, since the Austrians had more cards to move into deployment, they were able to maneuver into a flanking position. If they can get across the river quickly, the Bavarians are in deep doo-doo.

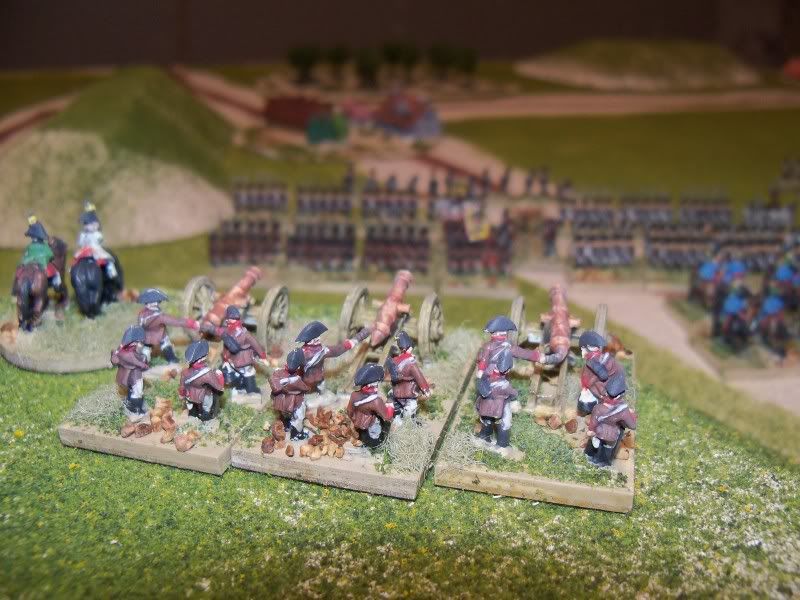
On the French left, the two cavalry brigades faces a single Austrian infantry brigade. The French have placed their heavy artillery in support, however, so if the Austrians respond by going into square, their own flank may end up being vulnerable.

From De nerdibus


From De nerdibus


From De nerdibus

Monday, May 9, 2011

Voila les francais!

And here are the French units now deployed on my tiny little table. I used my camera phone to snap these, and I'm not happy with the photo quality. Once again, clicking to enlarge should make things a little better.

Here is the entire French army. Some Bavarians try to secure the French left, leaving the main part of the army to concentrate on punching through the center.

From De nerdibus


French Brigade columns prepare to smash into Austrian lines, with cuirassiers ready to exploit the gap. If I were the Austrians, I would be very very scared.

From De nerdibus


The thin blue line defends a village from the Austrian horde. The houses are 6mm buildings from JR miniatures mounted on an old CD. I think the smaller scale looks appropriate, given the scale of the battle.


From De nerdibus


A brigade of French chevaux-legeres trying to pin down the Austrian flank, with a little help from their Italian buddies to the rear.

From De nerdibus


And here is the whole battlefield, packed tightly with tin. I love the look, but this is way to many troops for anything but a set piece battle. For my test engagement, I'll halve the number of troops on each side.

From De nerdibus

Saturday, May 7, 2011

10mm Napoleonic Austrians 95% finished!

OK, I'm not 100% finished, but I have enough of my 10mm Old Glory Napoleonic Austrians done to lay them out on the table in a pretty impressive diorama. This scene amounts to 30 battalions of infantry (18 line, 6 landwehr, 3 grenadier, and 3 jaeger), 8 regiments of cavalry (4 hussars, 2 dragoons, and 2 cuirassiers), and 12 batteries of artillery (6 heavy and 6 light). All done in under 10 weeks, and I did an equal number of French and allies in that time as well (still need to flock the bases on one French brigade. They should be up later this week).

Then it's time to test the rules I wrote for the first time.

The troops below are set up on a 3' x 4' board I made to re-enact the Battle of Germantown for my senior elective class (that's Germantown Pike in the foreground and the Wissahickon gorge in the background). Who knew the Danube campaign of 1809 spilled over into Pennsylvania?

NOTE: OK, you have to click the photos to see them in their entirety. Seems like blogger.com feels like my pictures need radical cropping.


Here is an infantry brigade. Jaegers in the front, with a line of infantry behind. Several assault columns provide support in the rear.


Another infantry brigade in pretty much the same formation. There is some artillery and a regiment of hussars attached.


The cavalry reserve, Cuirassiers in the foreground, with dragoons on the left in the distance. A regiment of hussars is ready to respond to any emergency.


I love this shot. Austrian heavy guns prepare to pound a distant enemy over the heads of their friends.


Tuesday, May 3, 2011

Best Mascot Ever

Charles Barkley once said "I am not a role model." And in response, about a million journalists, teachers, and parents smacked their heads. Of course, you're a role model, Sir Charles. Once you're in the public eye, you're expected to set a good example.

So when a sports figure actually goes out of their way to help others, they deserve praise for living up to their obligations.

I'm speaking, of course, of the Phillie Phanatic.Yesterday, my wife ran the Broad Street Ten-Miler, which was pretty darn impressive on its own. My kids and I participated in the One Mile Fun Run. Tristan bounced along gleefully, looking kind of like Tigger on uppers. Audrey's asthma got the better of her, and after a half a mile she slowed to a walk. She asked to quit, but I tried to keep her walking to the finish line. Finally, about a hundred yards from the finish line, I asked if she could try running, so at least she could finish on a positive not. She would have none of it.

Then a big fuzzy green hand reached out to her. Taking Audrey by the hand, the Phanatic ran with Audrey, who suddenly found it in her to accelerate to a sprint. Grinning broadly and flanked by her two big doofuses, she raced across the finish line and I swore she could have run another mile. Both kids received a medal for their efforts, and they were extremely proud. So was I.

Thanks, big guy! I don't need a magazine to tell me that you're the best mascot in sports. You're more like the best anything anywhere.